Cryptocurrency wallets are the foundation of safe digital asset ownership. Unlike a bank account where a third party holds your funds, a self-custody wallet like the OKX Web3 Wallet gives you direct control over your private keys. This means you alone are responsible for security, but it also means no one else can freeze or access your assets without your approval.
This guide walks absolute beginners through setting up an OKX crypto wallet using official methods only. We focus on the non-custodial OKX Web3 Wallet (distinct from your OKX exchange trading account). All steps are based on OKX’s current official processes as of March 2026. We include software (mobile and browser) and hardware options, detailed checklists, tables for quick reference, and clear risk explanations.
Why a Secure Wallet Matters for Beginners
Every crypto transaction is irreversible on the blockchain. If you lose access or expose your recovery phrase, your funds are permanently gone. A properly set-up wallet protects against phishing, device loss, and human error. OKX Web3 Wallet supports over 50 blockchains, built-in swaps, and DeFi connections while remaining non-custodial.
Types of Crypto Wallets: Quick Comparison
Before setup, understand your options. OKX supports all three main categories.
Wallet Type | Custody | Security Level | Best For | OKX Support Example | Drawbacks |
Custodial (Exchange) | OKX holds keys | Medium | Beginners who want simplicity | OKX trading account wallet | You do not control keys |
Software (Hot) | You hold keys | High | Daily use, DeFi | OKX Web3 Wallet app/extension | Device can be compromised |
Hardware (Cold) | You hold keys offline | Highest | Large holdings, long-term storage | Ledger/Trezor connected to OKX Wallet | Slower for frequent trades |
Recommendation for beginners: Start with the OKX Web3 Wallet (software) for learning. Move larger amounts to hardware later.
Step-by-Step: Setting Up the OKX Web3 Wallet on Mobile App
Download only from official sources
Go to the Apple App Store or Google Play and search “OKX”. Never use third-party links or APK files.Open the app and navigate to Web3
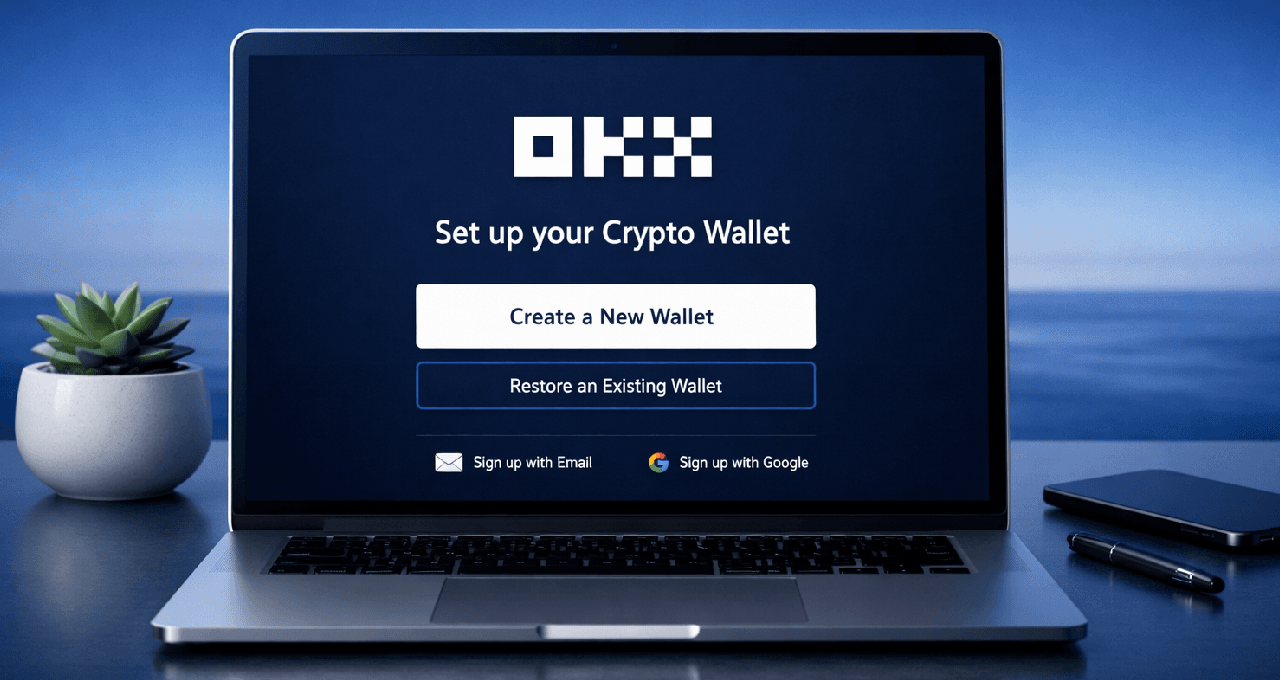
Tap the top bar and select “Web3”.Create a new wallet
Tap “Create Wallet” → “Create Now” (for a fresh seed-phrase wallet). Choose your security method: face recognition (biometrics) or password.Back up your wallet
You will receive a 12-word seed phrase. Write every word exactly in order on paper. Store the paper in at least two separate, secure offline locations (e.g., fireproof safe and trusted family member’s home).Do NOT take photos or screenshots.
Do NOT store in cloud notes, email, or password managers.
Confirm the backup by selecting the words in the correct order on screen.
Complete setup
Your wallet is now active. Enable any additional prompts for biometrics.
Time required: 3–5 minutes.
Step-by-Step: Setting Up the OKX Web3 Wallet Browser Extension
Install the official extension
Visit OKX, click “Download Extension”, and add it from the Chrome Web Store, Firefox Add-ons, or Edge store. Pin the extension for easy access.Create the wallet
Click “Create Wallet” → choose “Seed phrase”.Set security
Enable biometrics (if available) or create a strong password.Back up the seed phrase
Follow the exact same paper-backup rules as the mobile version. Confirm by re-entering the words.
Time required: 2–4 minutes.
How to Connect a Hardware Wallet (Ledger) to OKX
Hardware wallets keep your keys offline and are ideal for larger amounts.
Purchase a new device only from the official manufacturer website (Ledger). Never buy used.
Complete the hardware wallet’s own initial setup and write down its seed phrase following the same offline rules.
Open the OKX Web3 Wallet app or extension.
Go to “Wallet Management” or “Connect Hardware Wallet”.
Follow on-screen prompts to connect via USB or Bluetooth (Ledger Nano X supports Bluetooth). Approve the connection on the hardware device.
Your OKX interface will now show balances and allow signing of transactions while the private keys stay on the hardware device.
Tip: Test with a tiny amount first (e.g., $5 of a stablecoin) before sending larger sums.
How to Verify Addresses and Test Your First Transaction
Never copy-paste blindly—phishing addresses are common.
Address Verification Checklist
Compare the first 6 and last 6 characters of the address manually.
Confirm the correct network (e.g., Ethereum ERC-20 vs. TRC-20 on Tron).
Use a blockchain explorer (e.g., Etherscan for ETH) to verify after sending.
Start with a test transaction of $1–$10.
Step-by-Step Test Receive
In OKX Wallet, tap “Receive”.
Select the asset and copy the address.
Share only with a trusted test sender or use a small self-transfer from your OKX exchange account.
Step-by-Step Test Send
Tap “Send”.
Paste the verified destination address.
Select network and double-check.
Enter the amount and confirm on your device (or hardware wallet).
All transfers are final. Double-checking prevents loss.
Security Best Practices and Common Pitfalls
Security Checklist (Print and Use)
Seed phrase written on paper and stored in two offline locations.
Biometrics or strong password enabled.
App/extension always updated from official stores.
Never click suspicious links or approve unknown dApp permissions.
Use anti-phishing code if available in OKX settings.
Enable 2FA on your linked OKX account.
Common Pitfalls Table
Pitfall | Why It Happens | How to Avoid | Real-World Consequence |
Digital seed backup | Convenience | Use paper only | Funds stolen via cloud breach |
Fake app/extension | Phishing ads | Download only from official stores | Seed phrase stolen immediately |
Sharing seed phrase | Social engineering or “support” | Never share with anyone | Total loss |
Using public Wi-Fi for setup | Convenience | Use private network | Man-in-the-middle attack |
Skipping test transaction | Overconfidence | Always test small amounts | Large loss on first real transfer |
Recovery if You Lose Access
Your seed phrase is the only way to recover. Import it into a new OKX Wallet installation on another device. If you lose the phrase, funds cannot be recovered by OKX or anyone else.
Maintaining Your Wallet Long-Term
Review connected dApps monthly and revoke unused permissions.
Monitor for app updates.
Periodically check that your backup paper is still readable and secure.
For growing holdings, consider moving to hardware.
By following these steps exactly, you create a secure, self-custody OKX crypto wallet that puts you in control. Practice with tiny amounts until the process feels natural.
Suggested FAQ Section
Is the OKX Web3 Wallet the same as my OKX exchange account?
No. The exchange account is custodial (OKX holds keys). The Web3 Wallet is non-custodial—you control the keys.
What if I lose my seed phrase?
Funds are permanently lost. There is no customer support recovery for self-custody wallets.
Can I use the same seed phrase on multiple devices?
Yes, but each device must be secure. Never import on a compromised device.
Does OKX Wallet support hardware wallets?
Yes. It connects seamlessly with Ledger.
Need deeper training?
Join our structured modules with live examples and expert checklists for effective implementation.
JOIN THE ACADEMY